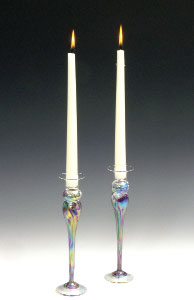
 There’s nothing as dull as a jury submission image of an unlit candle or lamp. A turned-off light doesn’t impress jurors or Web buyers. Realistically, craftwork that involves lighting sources (objects like candlesticks, candelabras, lanterns, table lamps, etc.) is often difficult to photograph. If you create work that lights up, this column is aimed at you.
The problem you face with a lighted object is to balance the existing or ambient light with the light from the object itself. By balance I mean that you need to produce a natural-looking image, where the lighted object is neither too bright nor too dark. You do this by literally shooting two images at once.
First of all, you will need a tripod. It is very difficult to get a sharp photograph of a lighted object without one. Set up a space for shooting your object. While I usually recommend setting work on a seamless background, when photographing a light-producing object, a lamp or candlestick in a natural setting will work for you. The light itself is the subject of the image and will reduce what would otherwise be the distraction of the setting. With this done, set up your craftwork and camera and frame the object in the viewfinder or on the LCD monitor.
Getting the correct exposure of lighted objects is critical. With a candle or a lamp there are two exposures to be aware of. One is the exposure setting for the object’s light and the other is the exposure for the object itself. Depending upon your camera, set the ISO to 100, 200 or 400. With a point-and-shoot camera, use the lower settings; with a digital SLR, use the higher ones.
Set up the lighting you are going to use. I like to photograph lamps and other electrical pieces with tungsten floodlights and candles with electronic strobes. I’ll explain this as we go along.
Candles are point sources of light. The center is very, very bright and then there is an area that isn’t quite as bright. To get the correct exposure for the flame, take your camera in hand (off the tripod) and bring it close to the candle flame—so the candle fills about half the frame. With the camera set to the Auto or P exposure mode, press the shutter release halfway down to get an exposure reading. In your camera display you should see both an aperture and shutter speed setting. It will be something on the order of f/5.6 at 1/60th of a second at ISO 100.
With the camera back on the tripod, set your camera to the M or manual mode and set the aperture and shutter to the settings you just got. Take a frame—don’t worry about the scene but look at the candle flame. If it seems small and dull, reset the shutter speed to a slower speed (1/30th or 1/15th of a second) and try again. Once you get an image in which the flame looks good, write down the aperture and shutter settings.
 Now set up the lights you will be using to photograph—this is the tricky part. You want the candle flame to be one or two stops brighter than the object itself. As a reference, if the candle flame looked right at f/5.6 at 1/30th second, then you want the exposure for the object itself to be f/5.6 at 1/15th sec—a difference of one stop.
Move the lights around until the object looks properly lit to your eye. Reset the camera to the Auto or P mode and from the camera position, press the shutter release halfway down and see what exposure reading you get. How close is it to the one-stop difference? If the reading you get is the same or higher than the setting for the candle, move the lights away from the object. If the exposure is below the candle setting, move the lights closer.
Once you have the correct exposure, reset the camera to the M (manual) exposure mode and set the camera to this setting. Take a frame. The object should be properly lit and the flame just a bit brighter.
Next, reframe the image so that the light’s brightest part lies along one of the frame’s thirds. A trick to help you with composing images on a monitor is to imagine the frame divided into thirds by two vertical and two horizontal lines, then place important elements of picture on these lines. Many cameras have built-in grid lines that you can bring up by pressing the display button on the camera body.
Color is also an important issue when photographing lighted objects. Both lightbulbs and candles produce a very yellow, warm light. In the AWB or Auto White Balance mode, your camera will try to correct for this warm color. If you are shooting candlelight sources with floodlights, set the Auto White Balance control to the T (tungsten) setting. This will produce proper colors in your craftwork and the candle will retain a little warmth.
For photographing lamps, follow a very similar method. The big difference is that rather than take an exposure reading near the candle flame, take the reading from the camera position. First, turn off your photography lighting. Frame the lamp and with the camera on Auto or P, take a picture. Review the image on the monitor. If the lamp is too dark or too light, use the camera’s exposure compensation control (a button marked with a +/- sign) to correct the image. If the lamp is too dark, try again and take a picture with the exposure compensation set to +1 and then another at +2. You want the lamp bulb to be bright and the area around it (that the lamp lights up) to be a little light. At best there should be a circle of light around the lamp. Note these readings and go back to the M mode and set the aperture and shutter.
Now turn on your lights and just as with the candle, move the lights around until the object looks properly lit. Take a picture and see how you are doing. Adjust by moving the lights as you would with the candle image. With lamps, I like to have the lamp be a little darker than normal. This will make the picture look more the way we “see” lamps in everyday life. HB
Steve Meltzer is a writer and photographer currently roughing it in the south of France. His photographic journey began 35 years ago when he had the good fortune to attend workshops with photographers such as Cornell Capa, Duane Michals, and Oliver Gagliani. Meltzer has written for publications as diverse as The Seattle Times, Popular Photography, New Awakenings of Lagos, Nigeria. Business clients have included Helly Hansen sportswear, Starbucks, and Boeing. He can be reached at stevefotos@cs.com.