I suppose digital photography will be perfected about the same time as flying cars hit the skies. Somehow, despite onboard computers that could drive a starship, folks are still having trouble getting really good photos.
Rather then bemoaning an industry that put features over performance, let me focus on how to troubleshoot some of the most common problems people have with their digital photos.
Auto-destruct
Perhaps the biggest cause of bad photos is the camera’s automation itself. Automation is all about compromises that seek to produce the largest number of useable images under “normal” circumstances.
Every digital camera, from a high-end digital single-lens reflex to an inexpensive pocket point-and-shoot, will produce excellent photos on a sunny day. But that’s not the condition when you are photographing your work.
For example, the newest bell and whistle on digital cameras is the “face detection” system. This feature seeks out a face in a photo and focuses on it. But if you are photographing jewelry, is the focus still looking for a face that’s not there? Yup.
So the first step in troubleshooting your pictures is too turn off the automation and make menu selections by hand.
Exposure problems
Among the most common problems in digital photography are pictures that are incorrectly exposed and are too light or too dark. This problem is usually caused by the camera exposure system reading the background and compensating for it. The photo of a piece of jewelry on a black background, for example, may show a washed-out object on a grayish background.
The solution is to go into the camera menu and either set the auto-exposure to “spot” metering or to use the exposure compensation control to adjust the image.
If the background is too light, compensate by setting the control to -1 or -2; if it’s too dark, go to +1 or +2.
Color issues
Color casts: The white balance control is a great boon to photography. It eliminates the need for color compensating filters to get the colors in a picture right. But it isn’t perfect. The camera’s white balance has a number of fixed settings—daylight, incandescent, etc. But these are fixed settings that don’t take reality into account. The color of daylight changes throughout the day. Indoor floodlights get redder over time. There are several different types of fluorescent tubes that produce different colors of light.
This mismatch can produces a color cast or overall coloration to the whole image. It may be a slight reddish tint or coolness in white areas. If you are consistently getting color casts, a simple solution is to go into the camera’s menu and, on the White Balance page, look for the Custom setting. Click on this line and then, with your lights on, place a white paper or poster board in front of your work and take a frame. Look at the image on the monitor. If the white looks white, save this as the custom setting and shoot the rest of your photos at this setting.
An alternative is to correct the color cast in a photo editing program like Photoshop. But that takes extra time and can introduce even more problems than it solves.
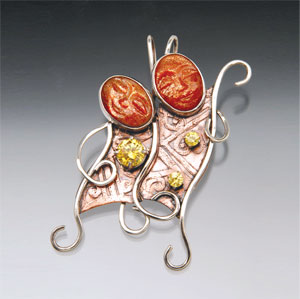
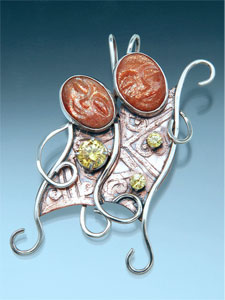 In the photo at left, my camera was accidentally left on tungsten white balance when I took this image using my studio strobes. The blue cast is the color correction added by the white balance control (jewelry piece by artist Pat Malin of Art Werks, North Aurora, Ill.). In the photo below it, I got the correct colors in the work by setting my exposure mode dial to the lightning bolt icon for “flash” when I re-shot the piece.
Another cause of color casts is mixed lighting. When working with tungsten floodlights, for instance, all other lighting must be blocked. All room lights must be turned off and all windows shuttered. If you are using daylight fluorescents, all room lights need to be off. If you are using two tungsten lights and the shadows are redder or bluer than the rest of the image, one of the lights is throwing off the color balance and needs to be replaced.
 Bad colors: When you are getting bad colors, but they are consistent, the problem can be the actual colors of the work. Despite all the technology, certain colors can throw off the camera, especially colors in the magenta/purple end of the spectrum.
Despite the white balance control correcting for the light source, there is still a problem. For example, incandescent lights produce a light that is yellow-red and the white balance can compensate for this. But because there is no magenta component in the light, it is very hard to get magenta colors right. The camera is cheating and producing a sort of generic magenta but our eyes can see the difference. To resolve this problem, either try different lights or work the images in Photoshop.
Sharpness issues
Narrow field of sharpness: Working with the camera set to auto-exposure, and especially under the relatively low light level of the studio, digital cameras tend to shoot at the widest aperture and fastest shutter speed. If the camera has an f/2.8 lens, it will go to that setting under low light.
But wide-open apertures mean very narrow depth of field and the problem gets worse as you get closer to work with small objects. If only a small part of your work appears in focus in your pictures, this is the problem. The solution is to set the camera exposure mode dial to either “A” (for aperture priority) or “M” (for manual) and set the aperture to f/11 or f/16. This will increase the depth of field so that most or all of your work will be sharp.
Auto-focus systems can be a problem too. These systems generally work by focusing the lens for the highest contrast between two adjacent points in the image. This works great for most sunny day scenes but can totally fail if you have a large ceramic bowl that is all one color. The large uniform surface offers nothing for the system to focus on.
It can be worse shooting close-ups where the focusing system is working at or near the limits of the lens range. In macro work, such as shooting earrings, being off in focus even a quarter of an inch can ruin the entire image.
Again, the solution is to shut off the automation. Set the focus to manual and learn how to get sharp focus visually using the viewfinder image or LCD monitor.
Blurry images: When you are using a small aperture setting to get deep depth of field, you invariably will be using slower shutter speeds. Most digital cameras have some sort of stabilization program that tries to keep the image sharp by moving the lens elements or the sensor. These systems generally work superbly, allowing you to get sharp images at very slow shutter speeds. But even image stabilization systems have their limits.
The best solution to this problem is a good tripod. And if you are looking at really long exposures—a half second or more—even the act of pressing the shutter release can shake the camera and introduce blur. To solve this problem I suggest the following trick. Go into the menu or use the button on the camera that sets the self timer. Set the timer to something like a two-second delay and take pictures by pressing the release and quickly removing your hand from the camera.
Framing issues
To my shock I discovered that my high-end digital SLR camera didn’t quite show the entire image that was recorded. This problem rarely occurs with the “live view” of an LCD monitor, but happens with SLRs where the mirror system may clip off part of the image. When your framing is done in the viewfinder and your work seems farther away in the pictures than you remember, you have this problem. The solution is to simply move in and have the piece fill the frame more than seems right.
There’s another framing issue, a very old one, and that is the mismatch of format and print sizes. Most point-and-shoot cameras have a 4:3 aspect ratio. In other words, if the picture was printed it would be 4- inches-by-3-inches or 8-inches-by-6-inches, etc. But when you make a 4-by-6-inch print you are going to lose some of the picture. The full 4:3 image will print as either a 4.5 by 6 or 4 by 5.3, or as an 8.25-by-11 image on a letter-size piece of paper—close, but no cigar.
Most digital SLRs, on the other hand, have the standard 3:2 aspect ratio. These images fit exactly on a 4-by-6-inch piece of paper but as a 7.3-by-11 or 8.5-by-12.75-inch image on a letter-size page. Again, you don’t have a perfect fit.
The point of course is that if you take the image files to a store to be printed (or print them in PictBridge auto-system on many printers) the default is to fill the paper and crop the image. But that can throw off your framing.
The solution is to be aware of the mismatch and work around it when you shoot.
Troubleshooting digital images is a lot easier than it was to fix film images. Film images always required a reshoot and waiting for days for the processing. With a digital camera you can correct problems in seconds and go on to take great pictures. TCR
Steve Meltzer is a Gig Harbor, Washington-based photographer. Visit his website at stevefotos.com.